The Goal
Arranging Attributes into Groups and Sets gives you more flexibility in how you present your data and can make it easier for you to find the information you need across your queries. To illustrate this, I'm going to show how we use Groups and Sets to understand the Chat behavior of our users.
Prerequisites
- Explore Professional or higher
- A custom ticket field to capture Troll and Ghost chats
At my organization, we use a custom field called Category 2 to capture metadata related to what users are asking about. Our Troll and Ghost Categories are located in that field.
Other References
Instructions
Use Case: Group
You should use a group when you want the grouped attributes to act as a single entity. This can be very handy if, for example, you have a team called Customer Success at your organization, but the members of that team work in the Onboarding, Engagement, and Retention agent groups in your Zendesk instance. It will allow you to create an attribute that will add them together and show data from across their various agent groups.
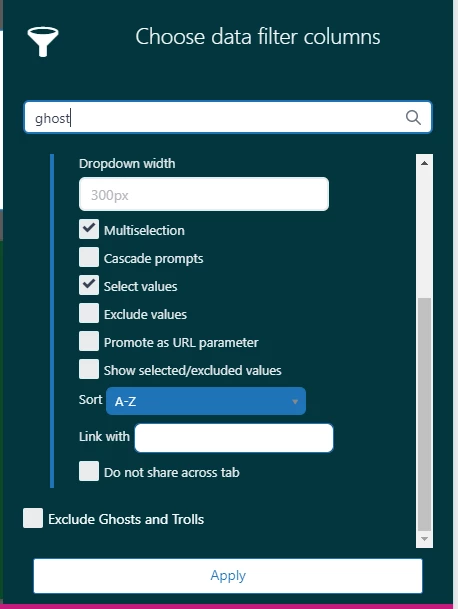
For this example, I want to exclude Trolls (people who are abusing my agents) and Ghosts (people who quickly leave a served chat without interacting) from my Chat data.
Step 1: Data
- First select the dataset you want to use. In this case, I'm targeting served chats, so I'm going to select the Chat: Engagement [default] dataset
- I select the D_COUNT(Served chats) as my metric
- Then I name and save the query
Step 2: Group
In order to easily filter this and other queries to exclude ghosts and trolls, I want to pull them out as a specific grouped attribute so I have a fast way to add that filter.
- First click on Calculations on the Right Side
- Select Group in the Attributes section
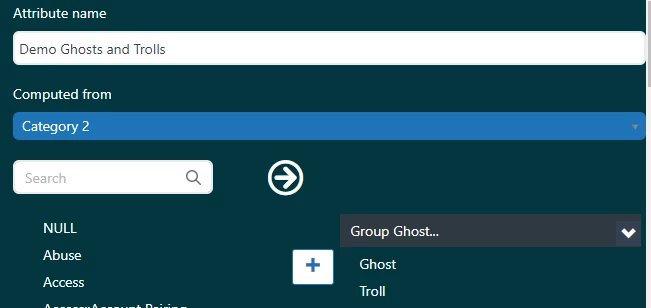
- This will open the Group interface. Enter the name of the Group (Demo Ghosts and Trolls is what I named mine)
- Then select the custom ticket field in the "Computed from" dropdown
- This will populate a list of the attributes in that field below
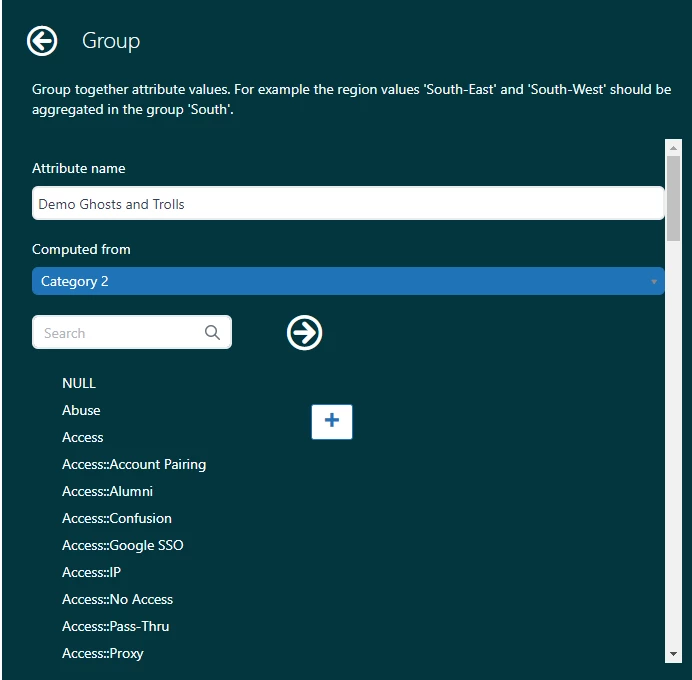
- Now search for the attribute you want to use
- Click on the attribute's name and click the + to add it to the right hand column
- Search for your second attribute
- Click on the attribute's name, but this time click the → to move it into the newly created group
- Now you can click into the Name Bar above your first attribute and rename it if you would like
Note: you can create multiple groups which can come in handy when you want to do things like group product lines into account codes for your Finance Department. Just highlight another attribute and click the + again to create a second group.
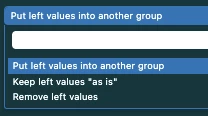
- Before you save, scroll all the way down and click on the blue drop down box right above the Save button. This will give you options for what you can do with the remainder of the attributes. If you do nothing, then your new group will be another option in a list that contains all of your attributes for that field. In this case, I only want to see my custom group so I can quickly filter data, so I'm going to select, "Remove left values" and then Save.
Step 3: Filter
- Click on Add at the top of your query to select your filter
- You'll find your new group in the Calculated Attributes section, or you can search for it
- Once it is added, click on the filter and select Exclude and then check your new Group and click Apply
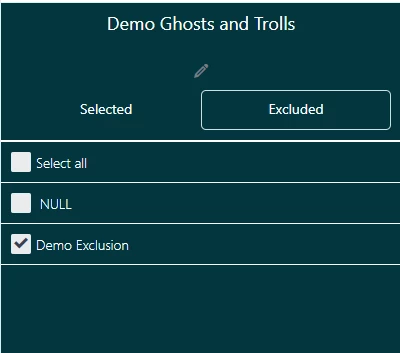
- You've now successfully excluded two attributes with one click.
Note: If you click on the pencil in this filter view, it will reopen the Group edit window so you can adjust the group. There is also a setting at the top right to Duplicate the group. This includes duplicating it **across the datasets**. This was a lifesaver for me because as long as the attribute exists in my other datasets it meant I could easily replicate the experience and ensure consistency.
Use Case: Set
If you drag your new Group from your Filters to your Rows, you'll notice that it only creates one row, even though there are two attributes inside that group. So what happens if you want to group items up, but see them as separate attributes in you query? That's when you use a Set!
Step 1: Create the Set
- I'm going to use the same metric as above, and clear my Group from the query.
- Click on Calculations on the right
- Click on Set under the Attribute Section
- Name your new Set
- Select the custom ticket field you want in the "Computed from" dropdown
- Search for your first attribute and check the box to the left
- Continue to search for your terms and check the boxes
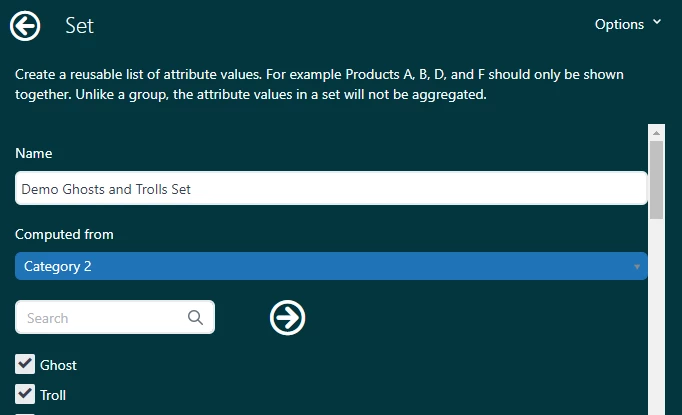
- Unlike Groups, the only items you will see in a Set are those you select, you don't have to click on a dropdown menu to exclude the other items
- Click Save
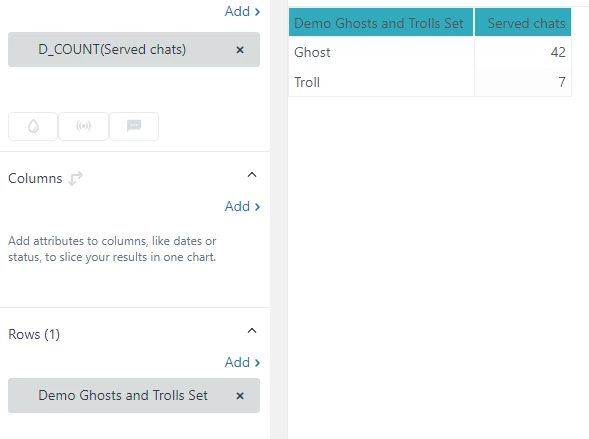
Step 2: Add your Attribute Set
- Now click on Add for your columns or rows
- You can Search or select your new Set from the Calculated Attributes section
- Now you should see the rows populate according to the attributes that are contained in your set, rather than as a single grouped entity.
Other Uses
Once I learned how Groups and Sets worked I used them for lots of things. Some are mentioned above, but here are some other uses:
- Does your Assignee list load really slowly? Add your assignees to a group and then hide the other values and it will now load quickly
- Have you noticed that when you add a Dash filter that is the same as a query filter it overrides? You can avoid that by filtering on a Group in your query
- You can group attributes in Custom Fields, but you can also group them in default fields. So, for example, you could group Problem and Incident tickets together to see them as a single number. You could do the same with ticket statuses or priorities.
- You could group Organizations together by size to understand how your cultivation accounts are doing.
There are lots of ways you could use this functionality to tell different stories with your data. I hope this helps you find new ways to upgrade your queries!